The holiday season brings with it a sense of joy and excitement, as people all around the world prepare to celebrate in their own unique ways. One beloved tradition that never fails to spread cheer is decorating the roofline with Christmas lights. The sight of a beautifully adorned house, illuminated by twinkling lights, instantly creates a festive ambiance that captures the spirit of the season.
Roofline decorations have become an integral part of holiday celebrations, allowing individuals to showcase their creativity and spread joy to their communities. From simple string lights outlining the edges of rooftops to elaborate displays featuring intricate patterns and vibrant colors, there are endless possibilities when it comes to adorning your roofline with Christmas lights.
The act of decorating the roofline with Christmas lights goes beyond mere aesthetics; it serves as a symbol of unity and shared happiness during this special time of year. It brings neighbors together as they marvel at each other’s festive displays, fostering a sense of community spirit and creating lasting memories.
In this post, we will explore various aspects related to decorating the roofline with Christmas lights. We will delve into different types of lighting options available, provide tips for creating an eye-catching display, discuss safety precautions to consider, and highlight some inspiring examples from around the world. Whether you are a seasoned decorator or just starting out on your festive journey, this section aims to inspire you and help you create a stunning roofline display that spreads joy and captures the magic of the holiday season. So let’s dive in and discover the joy of decorating your roofline with Christmas lights!
Plan and Measure
When it comes to planning and measuring for your Christmas lights display, there are a few key steps you need to take. The first step is to carefully plan out where you want to place your lights and determine the overall look you want to achieve. This can include deciding which areas of your roofline or outdoor space will be decorated, as well as any specific patterns or designs you have in mind.
Once you have a clear plan in place, the next step is to measure your roofline or outdoor space. This will help you determine the length of lights needed and ensure that you have enough to cover the desired area. To measure your roofline, use a tape measure or measuring tool to accurately determine the length and height of each section.
By taking these initial planning and measuring steps, you can ensure that you have a clear vision for your Christmas lights display and that you have the necessary materials on hand. This will help make the installation process smoother and more efficient, allowing you to create a stunning holiday lighting arrangement.
Gather the Necessary Tools and Materials
First and foremost, a sturdy ladder is essential for reaching high places safely. Make sure to choose a ladder that is appropriate for the task at hand and follow all safety guidelines.
Next, you will want to have clips or hooks on hand to securely hang your decorations or lights. These can be used to attach items to walls, fences, or other structures.
Extension cords are also crucial for providing power to your lights and decorations. Ensure that you have enough length and outlets available to reach your desired display area.
A light timer can be a valuable tool in automating your lighting display. This allows you to set specific times for the lights to turn on and off, saving both time and energy.
Lastly, zip ties or twist ties can be useful for securing loose wires or keeping decorations in place. These small but handy items can help ensure that everything stays in its intended position throughout the holiday season.
By gathering these necessary tools and materials before beginning your decorating process, you will be well-prepared to create a festive and visually appealing display.
Test Your Lights Beforehand
Before hanging your lights, it is crucial to test them beforehand to ensure they are in proper working condition. This step will help you identify any faulty bulbs or connections that may need to be fixed before proceeding further.
To test your lights, plug them into a power source and turn them on. Carefully inspect each bulb to ensure they are all lighting up as expected. Look for any flickering or dimming lights, as these could indicate a faulty bulb that needs to be replaced.
Additionally, check the connections between the bulbs and the wiring. Make sure they are secure and there are no loose or exposed wires. Faulty connections can not only affect the overall appearance of your light display but also pose a safety hazard.
By conducting this simple light testing process, you can address any issues before hanging your lights, saving you time and frustration later on. It is always better to fix any problems now rather than having to take down and rehang your lights after they have been installed.
Start at an Accessible Point and Work Your Way Around
When it comes to hanging lights from one corner to another and ensuring that the wires don’t get tangled along the roofline, it’s important to start at an accessible point and work your way around.
Beginning at a point where you can easily reach, such as a ladder or a stable surface, allows you to have better control over the lights and minimize any potential safety risks. It also helps prevent unnecessary strain on your body as you navigate the roofline.
As you progress along the roofline, make sure to secure the lights properly using clips or hooks designed for outdoor use. This will not only keep them in place but also reduce the chances of them getting tangled or loosened by wind or other weather conditions.
Additionally, consider using extension cords or light clips specifically designed for outdoor use. These tools are made with weather-resistant materials and have features that help keep wires organized and prevent tangling.
By starting at an accessible point and working your way around while taking precautions like using proper tools and securing the lights adequately, you can ensure a smooth installation process without any hassles of tangled wires along the roofline.
Use Proper Clips or Hooks to Secure the Lights in Place
When it comes to securing lights in place, using proper clips or hooks is essential. Depending on the type of roof you have, there are different options available to ensure a secure and safe installation.
For roofs with shingles, roof clips are commonly used. These clips are designed to slide under the shingle and provide a stable anchor point for the light strings. They typically have a hook or loop that allows you to easily attach and adjust the lights as needed. Roof clips for shingles are usually made of durable materials such as plastic or metal, ensuring they can withstand outdoor conditions.
If you have gutters on your roof, adhesive hooks can be an effective solution. These hooks are designed to stick securely onto the gutter surface without causing any damage. They often come with adhesive backing that is weather-resistant, ensuring they stay in place even during harsh weather conditions.
When using either roof clips or adhesive hooks, it’s important to follow the manufacturer’s instructions for proper installation. Make sure to position them securely and evenly along your roofline to create an aesthetically pleasing display while keeping the lights in place.
By using the appropriate clips or hooks for your specific type of roof, you can ensure that your holiday lights stay securely fastened throughout the season without causing any damage or posing a safety risk.
Create Patterns or Designs if Desired
Once you have set up your lighting installation and ensured that it is functioning properly, you can take your creativity to the next level by creating patterns or designs with the lights. This step allows you to add a touch of personalization and uniqueness to your lighting display.
One popular way to create patterns is by weaving lights in specific formations such as zig-zags or waves. This technique adds movement and visual interest to your installation, making it more dynamic and eye-catching. By strategically placing lights in these patterns, you can create a mesmerizing effect that captivates viewers.
Another option is to outline specific features of your space using the lights. For example, if you have large windows or architectural elements that you want to highlight, outlining them with lights can draw attention and enhance their beauty. This technique adds depth and dimension to your lighting design while accentuating specific areas of interest.
Whether you choose to weave lights in patterns or outline specific features, this step allows you to unleash your creativity and make your lighting installation truly one-of-a-kind. Experiment with different arrangements and designs until you achieve the desired effect that complements the overall ambiance of the space.
Consider Safety Precautions
When it comes to ensuring safety in electrical systems, it is crucial to consider certain precautions. In this step, we will focus on two important aspects: avoiding overloading electrical circuits and using proper outdoor-rated extension cords.
Overloading electrical circuits can lead to overheating and potential fire hazards. To avoid this, it is essential to understand the capacity of the circuit and not exceed its limits. This means being mindful of the number of devices or appliances connected to a single circuit. Distributing the load across multiple circuits or using dedicated circuits for high-power appliances can help prevent overloads.
Another safety measure is using proper outdoor-rated extension cords when working outdoors. These cords are specifically designed for outdoor use, with features such as weather-resistant insulation and grounding capabilities. Using indoor extension cords outdoors can pose significant risks due to exposure to moisture, temperature fluctuations, and other environmental factors.
By considering these safety precautions in this step, you can minimize the chances of electrical accidents or damage while ensuring a safe environment for yourself and others around you.
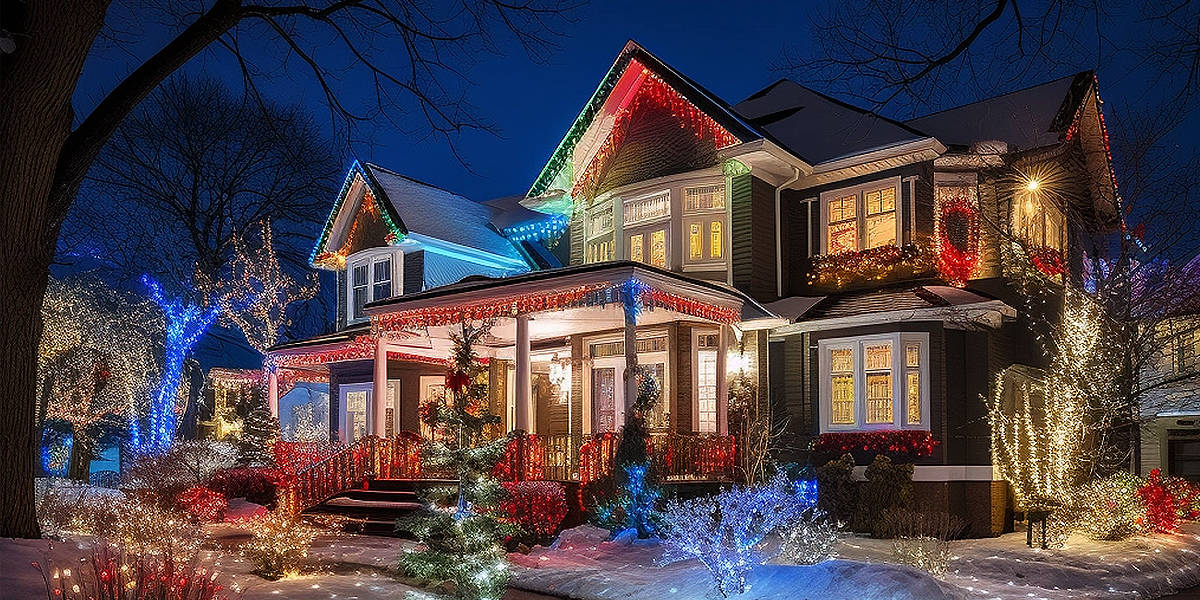
A Beautifully Lit Roofline Makes Any Home Festive and Welcoming
A beautifully lit roofline can truly transform the look and feel of any home during the festive season. By adding decorative lights to the roofline, homeowners can create a warm and welcoming atmosphere that instantly adds a touch of magic to their property. So why not brighten up your home this holiday season?
Contents
- Plan and Measure
- Gather the Necessary Tools and Materials
- Test Your Lights Beforehand
- Start at an Accessible Point and Work Your Way Around
- Use Proper Clips or Hooks to Secure the Lights in Place
- Create Patterns or Designs if Desired
- Consider Safety Precautions
- A Beautifully Lit Roofline Makes Any Home Festive and Welcoming